How to upload files with React & Laravel?
How to upload files with React on the front-end and Laravel on the back-end? In this tutorial we are going to build an application that will use Laravel authentication, form to upload files with a description, and a list to show those files with a simple relation between uploaded file and the user!
So, ready when you are!
- How to upload files with React & Laravel?
- Tutorial Prerequisites
- Create a new Laravel application
- What is Laravel migration?
- Scaffold Laravel – React UI with authentication
- What's changed in the code now?
- Creating the back-end
- Creating the React application
- Modify the App component
- Create the Uploads component
- Create the React form component
- Final application
- Conclusion
Tutorial Prerequisites
Create a new Laravel application
Firstly you will need to create a Laravel application. If you have installed Laravel installer you can accomplish it like this
laravel new <app name>If however for any reason you don’t have the installer you can by all means use composer like so
composer create-project laravel/laravel example-app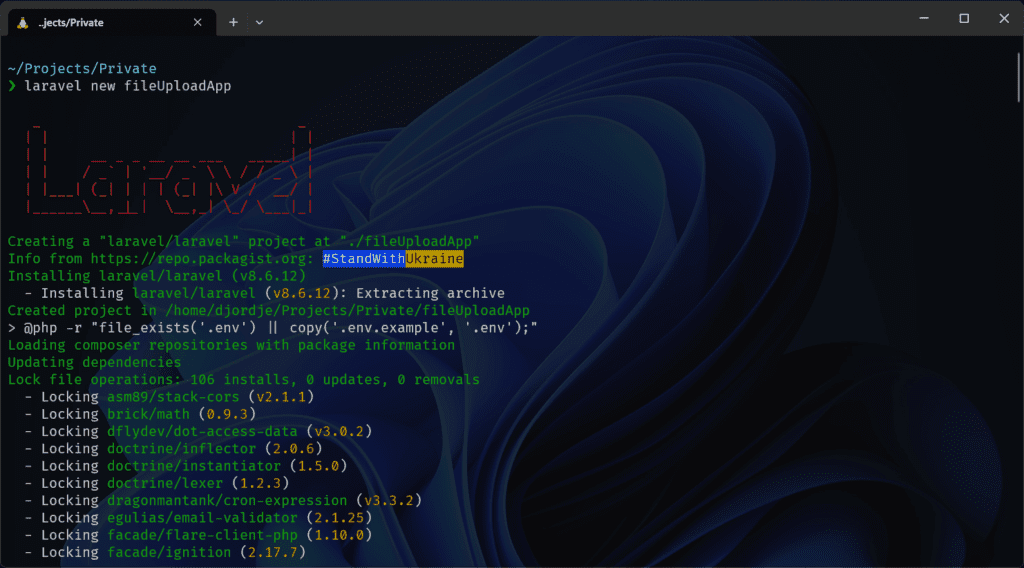
Firstly change the app name to something, secondly cd to that folder, and lastly, run the commands. After that’s done you will have a brand new Laravel application. So we can change a few stuff right off the bat. The environment file is the first one, there you define all of your environment variables. Duplicate the .env.example file, name it .env then open it and change the following properties:
APP_DEBUG=true
DB_CONNECTION=mysql
DB_HOST=127.0.0.1
DB_PORT=3306
DB_DATABASE=your_db_name
DB_USERNAME=your_user
DB_PASSWORD=your_users_password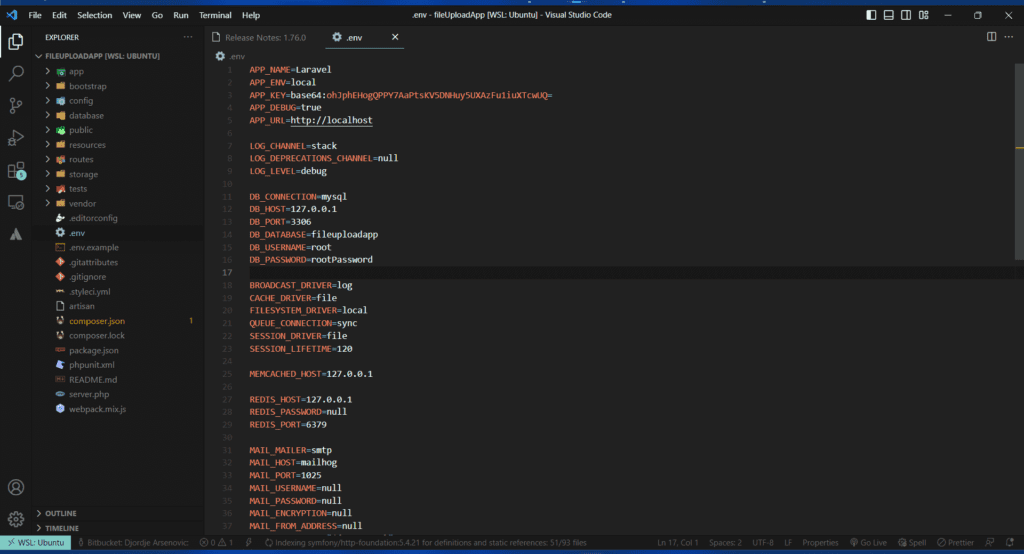
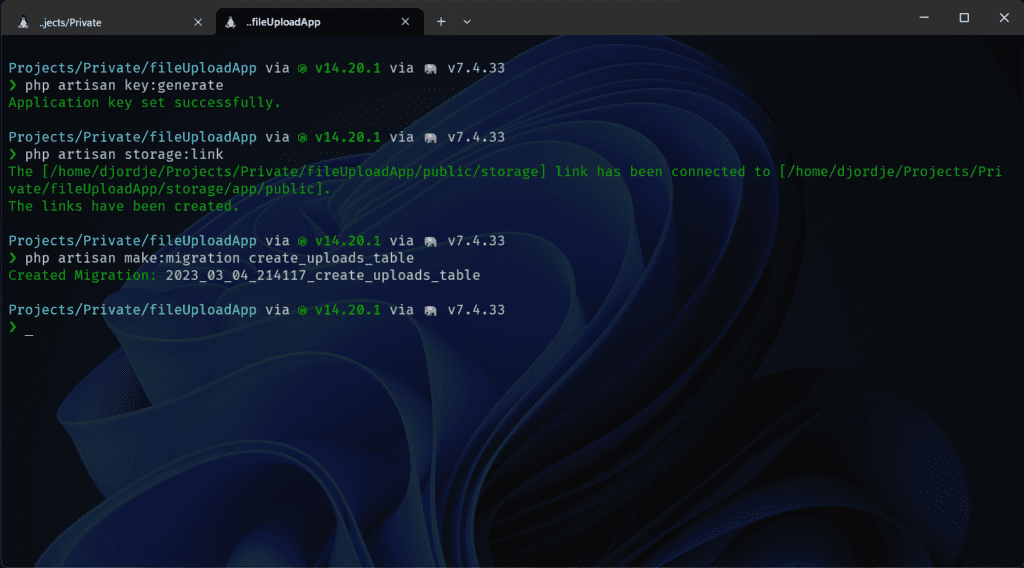
Let’s go and run a few more commands, firstly to generate application keys use:
php artisan key:generateThis will change APP_KEY property in the .env file. Secondly to create the symbolic link for the storage folder use:
php artisan storage:linkThis will create a symlink in the public directory called storage that will in fact point to this directory /storage/app/public. Lastly to create a new migration for the database use:
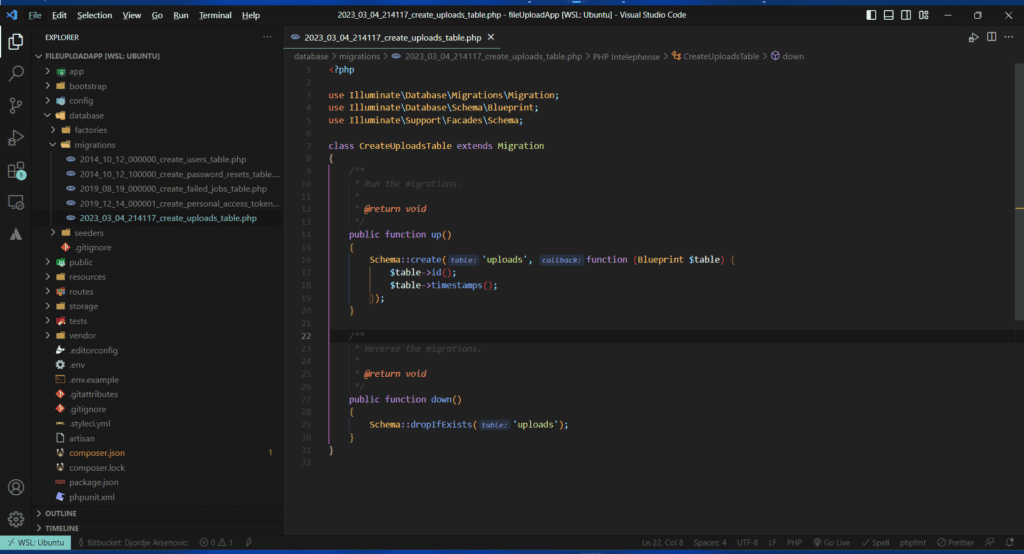
php artisan make:migration create_uploads_tableThis will create a new file in the database/migrations folder of our newly created application.
What is Laravel migration?
In simple terms Laravel migration is just a php class, extending another class, that’s it. It has two methods one called “up” and the other “down”. The first one is when you want to make changes to the database like we do want now, second is when you want to revert them.
Making and running Laravel migrations
So now that we finished all this it’s time to run our migrations. Laravel has some default migrations, it’s going to run them too automatically. But before we kick things off, we need to change our migration to suit our needs.
  /**
   * Run the migrations.
   *
   * @return void
   */
  public function up()
  {
    Schema::create('uploads', function (Blueprint $table) {
      $table->id();
      $table->string('name')->nullable();
      $table->string('path');
      $table->text('description')->nullable();
      $table->unsignedBigInteger('user_id');
      $table->foreign('user_id')->references('id')->on('users');
      $table->timestamps();
    });
  }
So we have a couple of columns here. Let’s break it down so we know what we are doing.
Laravel migration columns explained
- ID -> will create auto increment id column
- name-> will be a column, that can be null, but we intend to put data of type string.
- path-> this column will also be a string however it can’t be null it’s essential to our application.
- description -> this one is a text-type column it’s like a string but it can hold much more data.
- user_id -> this one will be absolute number columns meaning there will be no negative numbers
- Last but not least we are referencing the user_id as our foreign key. That’s going to be matched our id on the users column
- The last line will just create timestamps created_at and updated_at that are in fact really useful
- Uploads table image

Running Laravel application using serve command
To run this application you can use Apache or some other web server but I don’t want to get into the setup of those now. Instead, we are going to use the built-in command to run the application.
Firstly crack open the terminal, secondly cd to your app, thirdly run the following command:
php artisan:servelastly, you are going to ctrl+click on that link in the terminal for me it was http://127.0.0.1:8000/
Scaffold Laravel – React UI with authentication
In this section, we are going to generate standard Laravel authentication and React boilerplate. In this tutorial, we are not going to use the JWT token-based authentication because that’s not a goal we are trying to reach here. We are going to use the Laravel UI package to accomplish this, it will also generate react boilerplate with an example component.
What is Laravel UI and how to use it?
Laravel UI is just a composer package that you can find on the packagist link. It’s there to help the developers generate boilerplate applications quickly.
It’s a really nifty command for scaffolding applications that are going to use react. Well in order to use it, firstly we need to install it with Composer.
composer require laravel/uiSecondly, you can run this command to scaffold react and Laravel app
php artisan ui react --auththirdly run this command to install all the NPM dependencies
npm installlastly, you need to compile everything with the npm dev script
npm run dev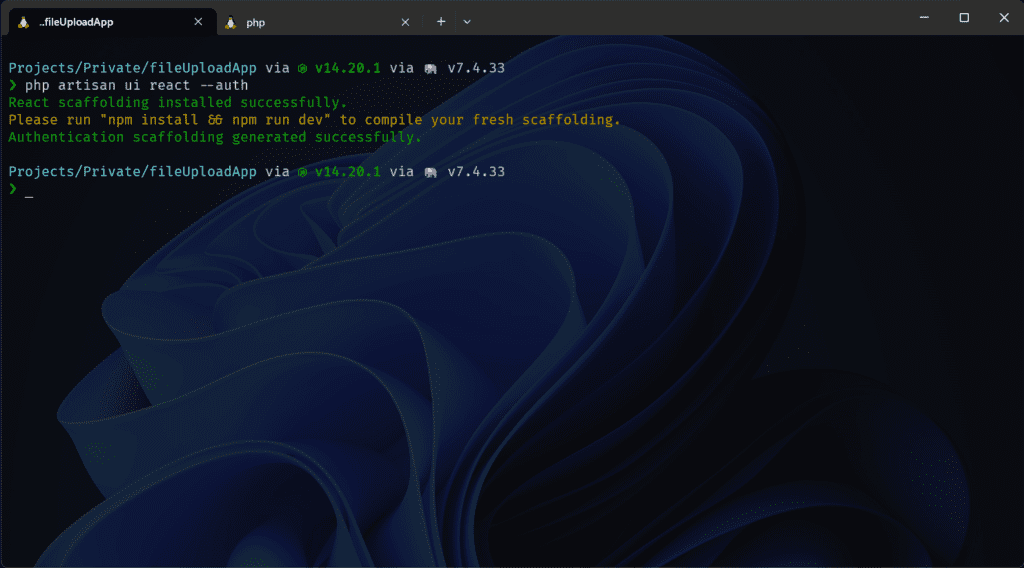
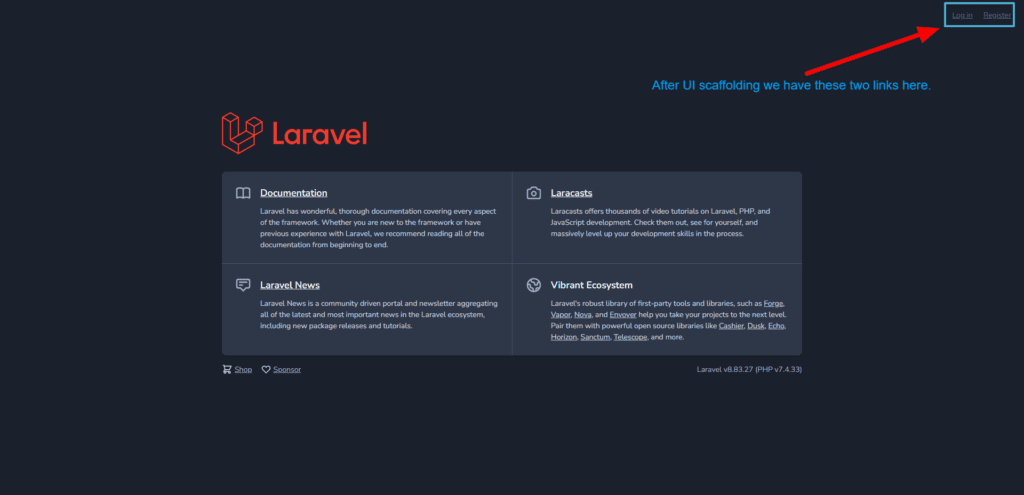
What’s changed in User Interface now?
After all, these commands that we have run go to your application link in the browser and you will probably notice the auth links in the top right corner. We have register and login links, that’s great.
Login and register links
Go ahead and register a new user, and log in with those credentials after that, you should see something like this below.
Logged in user
So to recap what we have now
What’s changed in the code now?
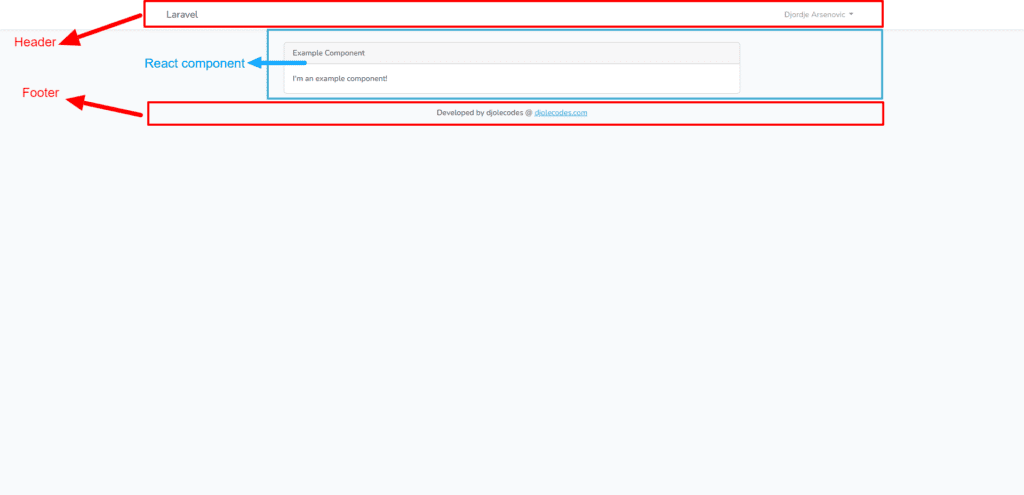
Well in the code we can see a lot of changes. But what’s interesting for our tutorial purposes is the resources/js folder as well as the resources/views folder. In the js folder, we have all the js boilerplate for rendering our Example.js component that Laravel ui created for us. And in the views folder, we have the welcome view that’s the one with the Laravel logo, and the home view that’s the one which says you are logged in.
Cleanup, rendering React component for the first time
Your react application will live in the resources/js/ there you will find the components folder and Example.js component. I like to rename it to App.js. Firstly change the Example component to be the App component, it will look like the code below.
import React from 'react';
import ReactDOM from 'react-dom';

function App() {
  return (
      <div className="container">
        <div className="row justify-content-center">
          <div className="col-md-8">
            <div className="card">
              <div className="card-header">Example Component</div>

              <div className="card-body">I'm an example component!</div>
            </div>
          </div>
        </div>
      </div>
  );
}

export default App;

if (document.getElementById('app')) {
  console.log('app')
  ReactDOM.render(<App/>, document.getElementById('app'));
}
Secondly, change app.js file to render the App component instead of the Example that doesn’t exists anymore.
require('./components/App');Lastly, let’s change the home.blade.php file that resides in the resources/views/home.blade.php to look like the code below.
@extends('layouts.app')

@section('content')
    <div id="app"></div>
@endsection
This HTML file is one of the two HTML files (well blade files) that we are going to need. Because all the other elements will be coming from React. You can see that we are extending something called layouts.app well that’s the second file from the two blades that we are going to use. The blade is a Laravel template engine that makes the front end really dynamic. In addition to the @extends command we also have @section that is using the placeholder content. All the HTML inside that section is going to be injected in the /views/layouts/app.blade.php file. Crack open app.blade.php to add a header and footer and to see where our content is going to be injected.
Find the following div and replace it with the header element
<div id="app"><header>
<nav class="navbar navbar-expand-md navbar-light bg-white shadow-sm">
...
</nav>
</header>After that cut the following code out of the header element and paste it under it.
<main class="py-4">
      @yield('content')
</main>
You see that @yield(‘content’) that’s will inject @section content from the home.blade.php file. After closing the main tag you can add a footer like this:
<footer>
  <div class="col flex-column justify-content-center align-items-center align-content-center text-center">
    <p> Developed by djolecodes @ <a href="https://djolecodes.com">djolecodes.com</a></p>
  </div>
</footer>
We are looking to achieve this kind of structure:
<header>
   <nav></nav>
</header>
<main></main>
<footer></footer>
Rendering React component for the first time
Instead of running the npm command each time we change some JS file we are going to use this command to watch for our changes. So open the terminal cd to your app, and run the following:
npm run watchThis will watch for the changes and automatically compile JS for us.
Now while logged in go and refresh your application browser tab. And voila, we are rendering the Example component! That’s happening for three reasons
- In the App component, we have document.getElementById(‘app’) that’s looking for that div in our HTML page
- That div is located in the home.blade.php file inside the content section
- That section is injected in the main element in the app.blade.file using @yield command
Styling the Application
To style the app we will be using SASS, which will be automatically compiled down to CSS thanks to our npm watcher. Add this code to the /resources/sass/app.scss file just to stick the footer to the bottom, and to set up some default props for the app. We are not going to write any more CSS or scss code because as you can see in the SASS file we are loading in the bootstrap.
html, body {
  height: 100%;
  margin: 0;
}

body {
  display: flex;
  flex-flow: column;

  footer {
    margin-top: auto;
  }
}
Creating the back-end
In this section, we are going to go through creating the Laravel model and controller for our application. We are going to write the whole logic for getting the uploaded files, and storing the file that the user uploads in the database and in the file storage as well. Let’s get our feet wet with creating the controller and the model for our uploads.
How to create a Laravel model and Controller?
Like before Laravel has a command ready for us! So crack open that terminal, go to the app folder, and run the following command
php artisan make:controller UploadsController --model=UploadThis will make UploadsController.php that will live inside /app/Http/Controllers/ and the model /app/Http/Models it’s common practice to give the controllers name like UploadsController for example. Notice the plural for uploads and for models singular Upload. When we open up the model we don’t have much, but we are going to change that real quick, and the controller that’s created is also known as the resource controller.
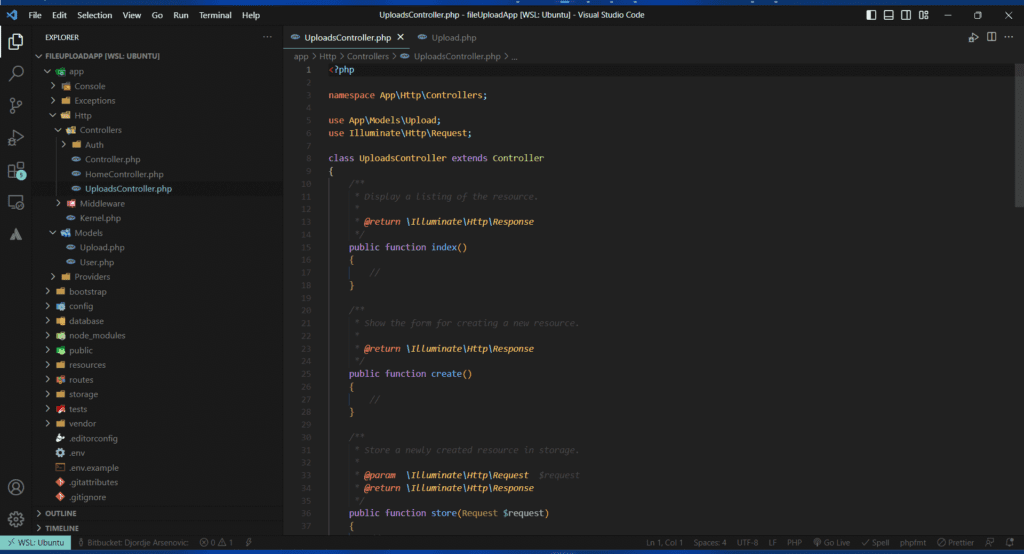
Changing the Laravel model
Open up the Upload model and let’s add the fillable array, this way we are going to tell Laravel what we are going to fill in which data. And you will see that this resembles the table that we have created in the migration section up above.
  protected $fillable = [
    'name',
    'path',
    'description',
    'user_id'
  ];
Changing the controller
Since I mentioned that Laravel created what’s known as a resource controller we have all of these methods here. We are going to remove some of them because we are not going to need them. Like create(), update() or edit(). Let me know in the comment section if you would like to add those features in the next post so we can create a full CRUD application. So please modify the controller to have only index(), store(), and destroy for now. Or don’t it’s not going to make any errors if you leave it there?
Add the following use statements to the controller above the class. Those are some classes we are going to use in our controller.
use App\Models\Upload;
use Illuminate\Http\Request;
use Illuminate\Support\Facades\Storage;
use Illuminate\Validation\ValidationException;
Create index method
First up we are going to modify the index method that’s the one we are going to call to get the previously uploaded documents.
public function index()
{
    try {
        $user = auth()->user();
        $uploads = Upload::where('user_id', $user->id)->get()->toArray();
        return response()->json(['uploads' => $uploads]);
    } catch (\Exception $exception) {
        return response()->json(['upload' => false, 'message' => $exception->getMessage()]);
    }
}- So in the try block what we are trying to do is firstly get the authenticated user, using
$user = auth()->user(); - Secondly, we want to get only that guy’s uploads by calling where() method statically on the Upload model, searching for the match against user_id from the authenticated user and our data in the database. Then we are going to get the collection using get() method and finally, we’re converting it to an array using toArray() the method.
- Lastly, we are returning the response, an array parsed to JSON with the key
uploads.
Create store method
This method is responsible for storing the file record in the database in addition to that it also stores the file in file storage.
public function store(Request $request)
    {
        try {
            $request->validate([
                'file' => 'required|file|mimes:png,pdf,jpg,webp|max:1024',
                'description' => 'nullable|string'
            ]);
            $uploader = auth()->user();
            $file = $request->file('file');
            $documentPath = $this->storeFileAndCreateLink($uploader->id, 'uploads', $file);
            $newUpload = Upload::create([
                'name' => $file->getClientOriginalName(),
                'description' => $request->get('description'),
                'path' => $documentPath['public_path'],
                'user_id' => $uploader->id
            ]);
            return response()->json(['upload' => $newUpload, 'message' => 'File uploaded successfully!']);
        } catch (\ValidationException $validationException) {
            return response()->json(['upload' => false, 'message' => implode(' ', \Illuminate\Support\Arr::flatten($validationException->errors()))]);
        } catch (\Exception $exception) {
            return response()->json(['upload' => false, 'message' => $exception->getMessage()]);
        }
    }
As well as the previous example, I am going to explain line by line what’s happening in this method. Lets kick things off with the try block first.
- We need to validate the request that we are getting. So we are validating two fields using the request validate function
- Firstly file field which we are going to create in our form later in a tutorial. It’s required field, it needs to be a file, and it needs to be one of the following files
- png,pdf,jpg,webp
- in addition to that it’s size cant be greater than 1024kb = 1mb
- Secondly, description field can be left out that’s why we have that nullable, but it needs to be a string.
- Firstly file field which we are going to create in our form later in a tutorial. It’s required field, it needs to be a file, and it needs to be one of the following files
- We are getting the user that’s uploading with laravel auth() helper.
- We are getting the file from the request, now take care we are using file() method for this and passing the field name inside.
- To store the file in the storage I have wrote a separate method storeFileAndCreateLink to which we are passing the Uploader id, name of the folder and the file itself. More about that function later.
- We are creating the new record in a database, with create method on the Upload model.
- From the file we are getting the original name
- For the description we are getting the value from the request object, using get() method.
- Path to the file we are getting as we should, from the function that stored that file.
- Lastly we are setting the user_id to the id of the uploader
- After we have created the record and stored the file we are returning the response with the stored file and the message.
- First catch() block is used for handling the validation exception if the validation fails in any way, for example user uploaded file bigger than our limit or other filetype this code will run.
- It returns the same kind of response but with the upload set to false, and with the errors,
Arr::flattenis so cool method, it as it’s name says flattens the array of multiple steps, to a single one. After that we use implode to create one string from that array, using ‘ ‘ (space) as glue. - Lastly we return the general exception. This exception will catch any problem that might happen.
- It returns the same kind of response but with the upload set to false, and with the errors,
Create method that uploads files to Laravel storage
As said above we are going to create the method for storing files. I would normally create a Trait for something like this in a bigger applications, because then you can just import it and use it, whenever you need to. So let’s break down this method, and explain it.
public function storeFileAndCreateLink(int $uploaderId, string $storageFolder, $file): array
    {
        $originalFileName = $file->getClientOriginalName();
        $fileExtension = $file->getClientOriginalExtension();

        $fileName = str_replace('.' . $fileExtension, "", $originalFileName);
        $fileName = strtolower(preg_replace("/[^a-z0-9\_\-\.]/i", '', $fileName));

        $preparedFileName = $fileName . '-' . time() . '.' . $fileExtension;
        $storagePath = storage_path("app/public/$storageFolder/$uploaderId");

        if (!Storage::exists("public/$storageFolder/" . $uploaderId)) {
            Storage::makeDirectory("public/$storageFolder/" . $uploaderId);
        }
        $file->move($storagePath, $preparedFileName);

        return [
            'public_path' => "/storage/$storageFolder/$uploaderId/$preparedFileName",
            'storage_path' => "$storagePath/$preparedFileName"
        ];
}- First it gets the filename, and the extension of the uploaded file
- Then it removes the extension from the filename, and removes all the unwanted characters with the regex inside filename.
- Creates the final version of the file name using, file name, unix timestamp of the current time using time() function, lastly it concatenates the file extension back again.
- With the storage_path helper we are getting the folder where we are going to upload the file.
- If it doesn’t exist create it.
- Finally upload the file using move() method and return the paths
How to create Laravel routes?
Open up the /routes/web.php file and create the following routes
use App\Http\Controllers\HomeController;
use App\Http\Controllers\UploadsController;
use Illuminate\Support\Facades\Route;
//...
Auth::routes();

Route::get('/home', [HomeController::class, 'index'])->name('home');
Route::post('/upload-file', [UploadsController::class, 'store']);
Route::get('/get-uploads', [UploadsController::class, 'index']);
It’s important to not that all these routes are below Auth::routes(); call. That’s how we know that in order to use these routes we need to be authenticated.
Creating the React application
Since we have built the back-end side, now it’s time to build the front-end. We are going to create couple of components to structure the application better in smaller pieces making it easy to debug and to upgrade. Laravel comes with pre-installed axios for making the requests, but you can use the Fetch API too if you want. Since we are going to show dates in our app we need to install moment js package.
npm install moment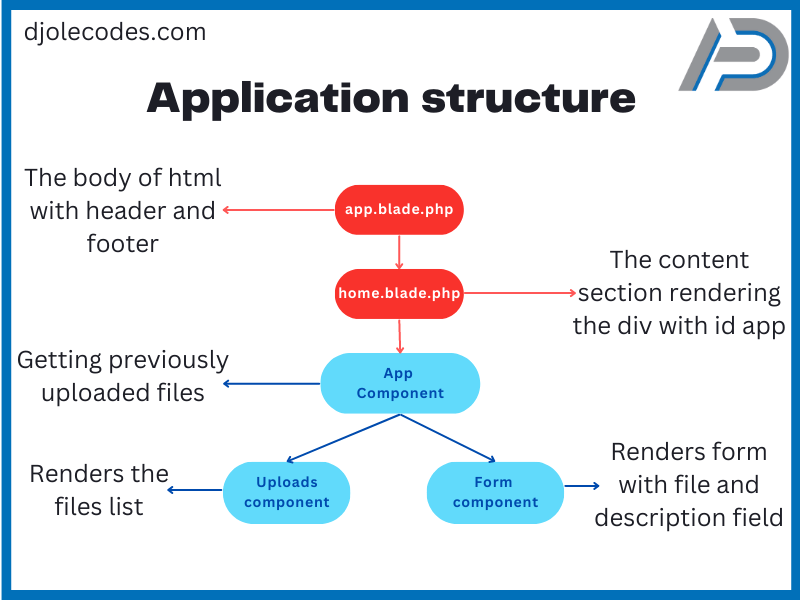
Modify the App component
App component will be our father component. It will hold other two together and call the backend to get the documents. In addition to getting the previously uploaded files we are also going to set the state here. For setting the state we are going to use React hook useState() and our AJAX call we are going to wrap inside useEffect hook and we are going to fire it only once therefore we are optimizing our application.
import React, { useEffect, useState } from "react";
import ReactDOM from "react-dom";

function App() {
    const [uploads, setUploads] = useState([]);
    useEffect(() => {
        axios
            .get("/get-uploads")
            .then(({ data }) => {
                console.log(data);
                setUploads((prevState) => {
                   return data.uploads;
                });
            })
            .catch((err) => {
                console.log(err);
            });
    }, []);
    return (
      <div className="container">
</div>
    );
}
// ...
Before rendering anything we are going to create our logic like the code above.
- Firstly import the react hooks
- Secondly, utilize the state with the useState hook
- Thirdly create use the useEffect hook to create the ajax call using
/get-uploadsroute that we created previously - After the request is done if there were no errors, then block runs
- Set the state with our newly fetched data
- If there were some errors catch block will run
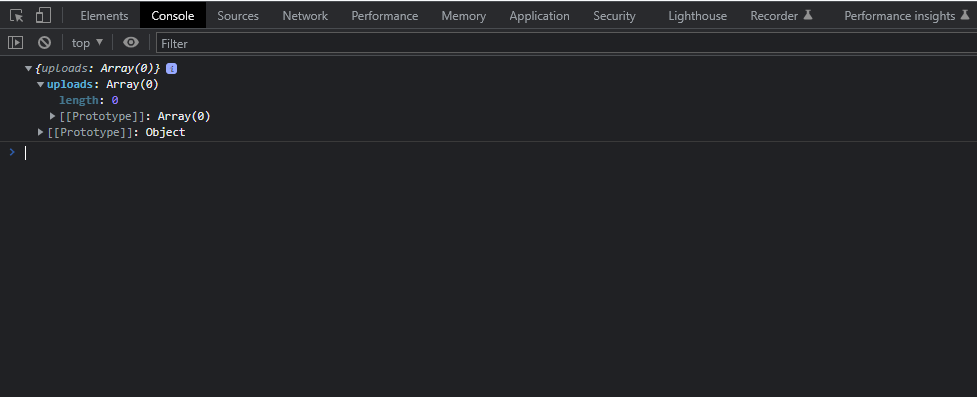
In the console, you should have an empty array showing up like up above. That’s because we don’t have any files uploaded yet but that will change soon.
Create the Uploads component
To render the uploads we are going to create a new component. It will loop through the array and render the list item for each file that we have uploaded. Create a new file inside /resources/js/components called Uploads.js.
import React from 'react';
import moment from "moment";

function Uploads({uploads}) {
  return (
      <div>
        <ul className="list-group">
          {uploads ? (
                    uploads.map((upload) => (
                        <li key={upload.id} className="list-group-item">
                            <div className="row">
                                <div className="col-6">
                                    <a href={upload.path} target="_blank">
                                        {upload.name}
                                    </a>
                                    <p className="mb-0">{upload.description}</p>
                                </div>
                                <div className="col-6 text-end">
                                    <span className="badge bg-primary">
                                        {moment(upload.created_at).format(
                                            "DD-MM-YYYY, h:mm:ss a"
                                        )}
                                    </span>
                                </div>
                            </div>
                        </li>
                    ))
                ) : (
                    <div className="alert alert-info">
                        <p>There are no uploaded files.</p>
                    </div>
                )}
        </ul>
      </div>
  );
}

export default Uploads;- Here we are receiving props and destructuring it in the function signature. Because we know that props are objects holding the keys that we will set. And in this case, key will be uploads.
- After that, we are checking if we have uploads using && if we do we are going to use map method on array to loop through.
- Map method receives a callback function that will get a single array element, and then we can return our list item, we are doing that implicitly by using the () parentheses.
- Each element in the loop needs to have a unique key, nothing better than a primary key from the database to do this job.
- We are setting up some CSS classes, as you can see we are not using standard html attribute because class is a reserved keyword in JS
- For the href we are setting the upload path that we stored in the database previously so we can open up the file, and we are also using the new tab for that.
- Previously we have installed momentJS to format our created date. We are using it like this to get a nice date format
moment(upload.created_at).format('DD-MM-YYYY, h:mm:ss a') - Lastly, if there are no files you will see the alert like below
Connect two React components
In this section, we are going to add the Uploads component to the App component.
Firstly we need to import it like so:
import Uploads from "./Uploads";secondly, we need to use it in the JSX
<Uploads/>lastly, we are passing the props as I have explained earlier with the uploads key
<Uploads uploads={uploads}/>Now I am going to add some JSX code with bootstrap classes so our app looks nice, the end result should look like this:
return (
      <div className="container">
        <div className="row justify-content-center">
          <div className="col-10">
            <div className="card my-2">
              <div className="card-header">
                Previous uploads
              </div>
              <div className="card-body">
                <Uploads uploads={uploads}/>
              </div>
            </div>
          </div>
        </div>
      </div>
  );
Create the React form component
Now let’s create one more component in the components folder called UploadDocumentForm.js. This component will be rendering the form and it will make the POST requests to the server to upload files and create database records. Before we begin you can install one more package called sweet alerts using the following command.
npm install sweetalert2Now let’s take a look at our new component.
import React, { useState } from "react";
import Swal from "sweetalert2";

function UploadDocumentForm({ setUploads }) {
    const [description, setDescription] = useState();
    const [file, setFile] = useState();
    const handleSubmit = (e) => {
        e.preventDefault();
        const formData = new FormData();
        formData.append("file", file);
        formData.append("description", description);
        axios
            .post("/upload-file", formData, {
                headers: {
                    "Content-Type": "multipart/form-data",
                },
            })
            .then(({ data }) => {
                const { upload, message } = data;
                if (upload) {
                    setUploads((prevState) => [...prevState, upload]);
                    Swal.fire({
                        title: "<h3>Success!</h3>",
                        icon: "success",
                        text: message,
                    });
                } else {
                    Swal.fire({
                        title: "<h3>Error!</h3>",
                        icon: "error",
                        text: message,
                    });
                }
            })
            .catch((err) => {
                console.log(err);
            });
    };
    return (
        <form onSubmit={(e) => handleSubmit(e)}>
            <div className="row d-flex justify-content-center align-items-center">
                <div className="col-12">
                    <label htmlFor="file">File</label>
                    <input
                        className="form-control"
                        type="file"
                        onChange={(e) => setFile(e.target.files[0])}
                        name="file"
                    />
                </div>
                <div className="col-12">
                    <label htmlFor="description">Description</label>
                    <textarea
                        className="form-control"
                        name="description"
                        value={description}
                        onChange={(e) => setDescription(e.target.value)}
                    ></textarea>
                </div>
                <div className="col-6 text-center my-2">
                    <button className="btn btn-outline-primary">Upload</button>
                </div>
            </div>
        </form>
    );
}

export default UploadDocumentForm;
We can break it down to three parts:
- Initialize state
- Handling submit action
- Returning the jsx
Initializing React state
const [description, setDescription] = useState();
const [file, setFile] = useState();
For each field that we have in the form, we are using the Ract state. Now in the form, we can use setFile or setDescription whenever the field value changes.
React submit event handler
Now we are going to create form listener. We are going to listen for submit event. On the form element we are going to add this part:
<form onSubmit={e => handleSubmit(e)}>This as you can see is using built-in react event, onSubmit which equals the arrow function, which calls another one handleSubmit() and passes on the event object as the parameter. After that, we are using FormData() to create the form data for the server. We are first preventing the default submit action. After that, we are creating the FormData object and appending the file and description.
After that, we are submitting the request to /upload-file route with the formData object and we are setting up the headers for the request. We need to let the server know that we are sending the file. So we are setting content-type to multipart/form-data.
Handling the uploaded file
If anything goes well, then() block will run and we are going to pull the record we have just created and the message from the data object. If the upload is not false we are using the setUploads function to inject the new upload in the state. The setUploads function we’ve got from the props object, it receives the callback function as an argument. In that callback we are using the ES6 spread operator to spread the previous state and push the new upload.
After we’ve changed the state we can render the success alert using sweetAlert package that we’ve previously installed. However, if the upload is equal to false we just want to alert the user about that and we don’t want to change the state at all.
Wire up the Upload form and the App component
Now in order to use the form to upload files firstly we are going to import UploadDocumentForm into the App component secondly we are going to use it in our JSX.
<div className="card">
<div className="card-header">Form to upload files</div>
<div className="card-body">
<UploadDocumentForm setUploads={setUploads} />
</div>
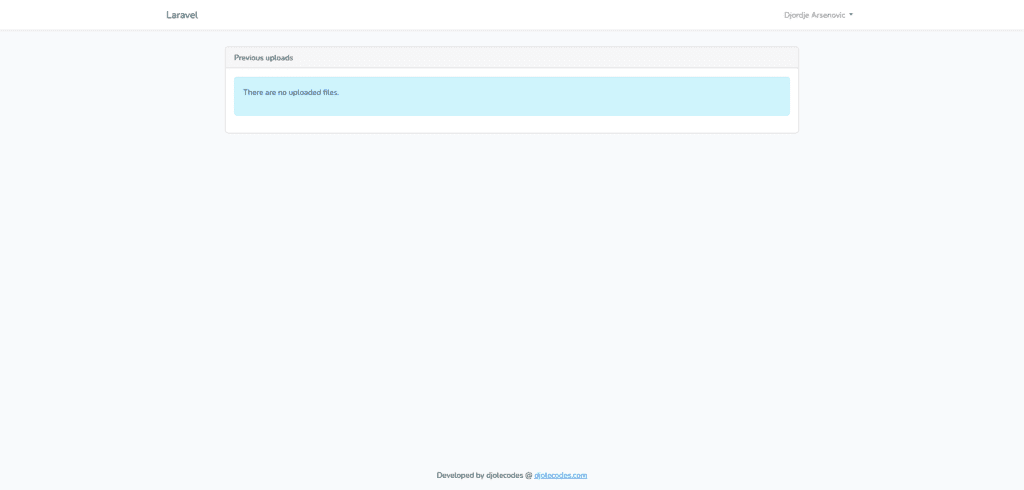
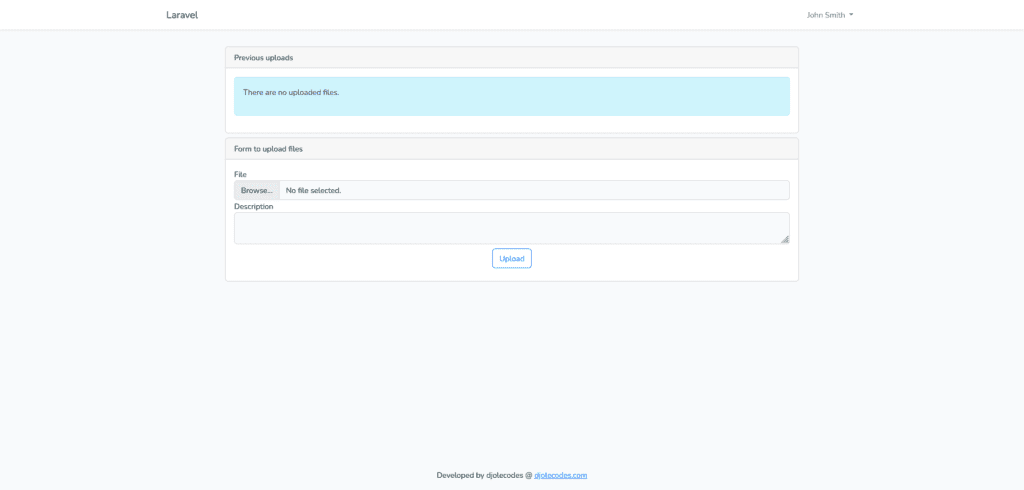
</div>Now navigate to your application in the browser and you should see your application rendering correctly with the form and the uploads list that’s currently empty.
When we upload something the application will render the list like below
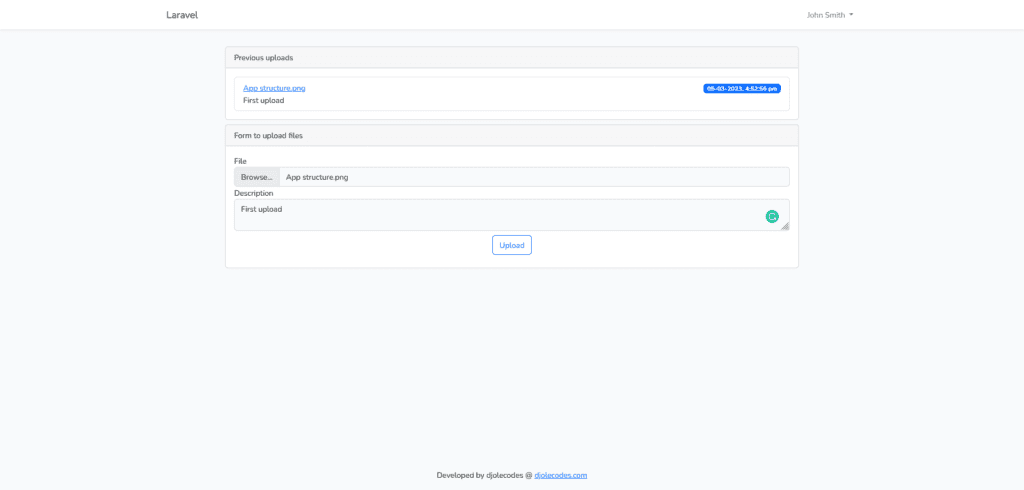
Final application
Conclusion
Wow, we have covered quite a number of things here. If you got this far, congrats now you have a working application that checks all the boxes below.
For production-ready web applications or for big projects, it’s always a good idea to hire Laravel developers.
Let me know in the comments what would you like to see next.